

Nowadays the commercial vegetables are filled with toxic as farmers work to meet consumers demand. Toxic chemicals includes strong pesticides, hormones and sometimes even food dyes which is damaging to our health and the environment. With this awareness, many do try to switch to organic food but it can get a bit expensive. Luckily, there’s a cost effective solution to it which is growing your own fresh, nutritious and wholesome produce. It is fun, therapeutic, relaxing and educational at the same time.
By creating a vegetable garden you will be able to enjoy fresh and richer flavour foods. On top of that you will contributing to the environment whilst helping yourself to lead a healthier life. If every household starts applying this idea, soon natural household waste will be consumed by our own vegetable garden and we will contribute to reducing the pesticide, toxins and garbage issue of our country.
To start your own vegetable farm, it can seem daunting at times. Do not worry, here is a simple guide to help you kick start your garden.
Click on the tabs below corresponding to the gardening stage you are in:
Before You Start Your Garden
Select one of the steps below:
Step 1: Choose the right spot
Choosing the location is the first exciting part. With enough time, effort and materials you can create a successful productive garden almost anywhere. Plus healthy plants have greater resilience to pests and diseases. But if you have selected the wrong spot, you might end up needing to put more work than necessary. Hence a good start to your garden is by selecting the right spot.
a) Does it have sufficient sunlight?
Most fruits and vegetables need full, unobstructed sunlight for at least 6 hours a day to maximise their sugar level. It is helpful to observe the selected spot(s) every hour or so and note areas of shadow. You might want to consider:
- removing whatever that creates the shade
- changing the your garden to match the sunlight exposure area
b) Is it near any big tree(s)?
Big trees will have shadows blocking direct sunlight. On top of that its root systems can possibly be affected.
c) Is it near a spigot and hose or water source?
Vegetables contain more than 70% water. Nutrients from the soil gets absorbed into the plant through a film of water surrounding the tiny root hairs present in plant roots. Therefore keeping your plants well-watered is important especially during seeds germination period. If it is near a water source it will save you multiple trips with watering can or needing to get extra-long hosepipes
d) How is the drainage?
Drainage is as important as watering. Most vegetables cannot grow in a swamp. Water-logging can cause root rot issues resulting in sickly plants.
e) Will you see the spot often to keep an eye on progress?
Watching your plants grow is very exciting. However over time the common saying of ‘out of sight, out of mind’ applies to your garden too. Unattended garden will be cover by overgrowth and weeds adding a lot of extra work.
Step 2: Decide on the size
One of the questions to consider is area you want to plant your vegetables. Generally, it is your own preference. There is no hard rules that states your area have to be lined in any particular way. In fact, any small area on your terrace, open space like rooftop, balcony or an open ground space can be converted into a vegetable garden. Just any shape and size you want!
Optional: Invest in tools and accessories
Gardening can be made easier with few simple tools and accessories. Consider investing in the best you can afford as you will use them quite frequently to plant and maintain your garden.
Watering your plants is one of the top tasks at your garden. In tropical country like Malaysia you need to water at least once daily except for rainy days. Choose as large a can as you can comfortably carry and hold when it is filled.
Watering your plants is one of the top tasks at your garden. In tropical country like Malaysia you need to water at least once daily except for rainy days. Invest in a quality water hose along with nozzle with multiple patterns. Having an easy-to-use hose storage will make your job easier.
Automated Watering System
Watering your plants is one of the top tasks at your garden. In tropical country like Malaysia you need to water at least once daily except for rainy days. Automated watering system is a hassle free option for those with busy life-style or planning a vacation. The most common are drip irrigation and sprinkler
Garden Spade
An essential tool in gardening. With its flat, rectangular blade it is used for digging, slicing through and lifting soil and roots, moving soil and loose material, edging lawns, shaping beds, skimming weeds and making straight-sided holes for trees or trenches.
Garden Shovel
A key tool for digging deep holes, loosening up, turning and scooping soil. The convex pointed blade comes in different length and shape (depending on the intended use), usually larger than spades.
Garden Fork
There are 2 types of digging forks – digging fork and manure fork. Digging fork is shorter and have fatter prongs to dig out plants and remove weeds. The latter is used to loosen, lift, turn and spread organic matter like manure, compost and mulch.
Garden Rake
Rake is a preferred tool to prepare the soil for vegetable gardens – one side is to draw and move soil whilst the flat side when flipped over is perfect for smoothing the bed. It is also used to move leaves, gather grass clippings and cleaning up the garden without damaging plants.
Garden Trowel
This is one of the frequently used tools as most of gardening involves digging, making holes and removing weeds. Invest in ergonomic design trowels to reduce arm fatigue.
Secateurs
Secateurs (pruners) are designed to smoothly prune perennials, trim new growth on shrubs, cut non-woody stems and thin pieces of wood
Garden Gloves
Yes, it is good to feel the soil during gardening. However sometimes when dealing with thorny plants or wet-weather gardening a good pair of gloves protects you from weather-beaten hands and injuries.
Garden Bucket
A simple bucket can come in handy for gardening in so many ways. In fact having one is just not enough. It is common to use recycle bucket as long as it is safe to do so. With a bucket you can use to transfer soil, collect weeds, remove garden pests, carry water, collect harvest etc
For additional comfort
- Broad-brimmed hat
- Comfortable clothing
- Waterproof or/and comfortable footwear
- Knee or kneeling pads
- Stools
- High SPF sunscreen
- Steps
Planning Your Garden
Select one of the steps below:
Step 1: Decide on the type of vegetable garden
There are a few ways to plant your vegetables, namely:
-
In ground
-
In ground with edging
-
Raised beds
-
Container garden
-
Elevated planters
-
Vertical garden
-
Hydroponics
-
Aquaponics
In ground
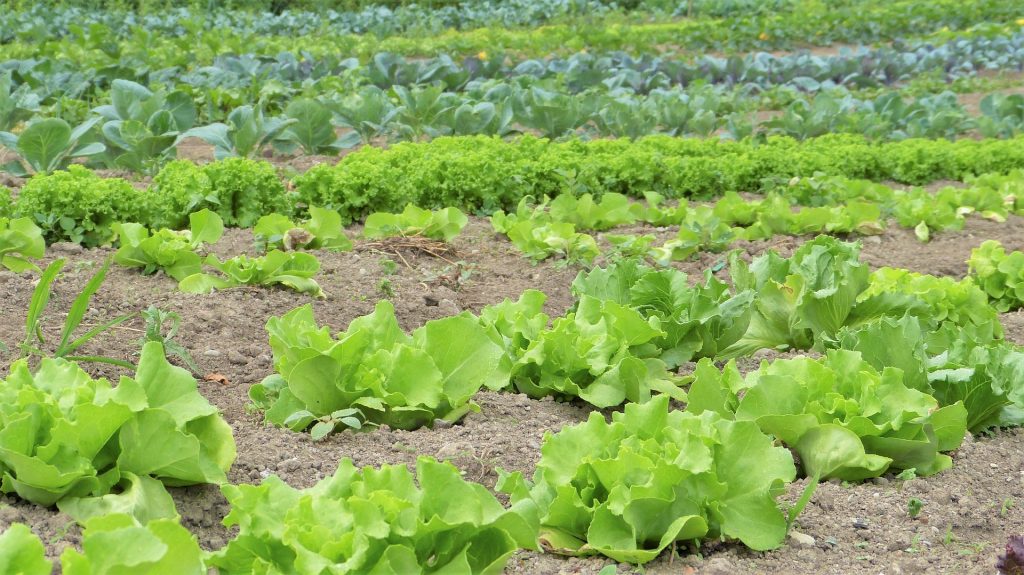
This is the easiest way to get a vegetable bed established with least investment. Basically you just need to prepare the ground and add good quality soil. The challenges of this method are:
- higher risk of being attacked by weeds and slugs
- during raining seasons, there will be some soil “runoff”
- it can potentially be damaged by children, pets or/and animals that will walk on the bedding too.
In ground with edging
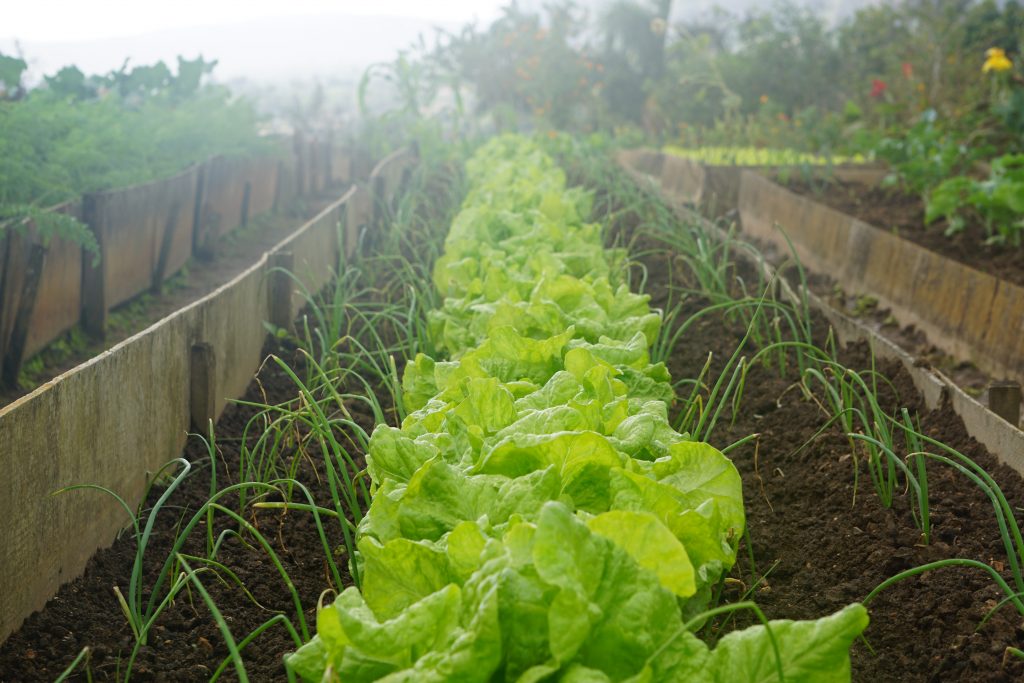
This is similar to in ground vegetable bed but with an edging barrier inserted between your lawn and your bedding. Depending on the depth and height of the edging, it can protect your garden bed from children, pets or/and animals walking on it. A small fence of stones, bricks, or wood will help prevent ground runoff after especially heavy rains. Your garden will look neater too.
Raised Beds

This is an alternative to in-ground planting especially if you don’t have good soil for planting. A garden box with an open bottom is used. The box should be high enough for proper depth of soil to be filled. Dependent on individual preference the height can be made wheelchair accessible and/or suitable for gardeners with backaches.
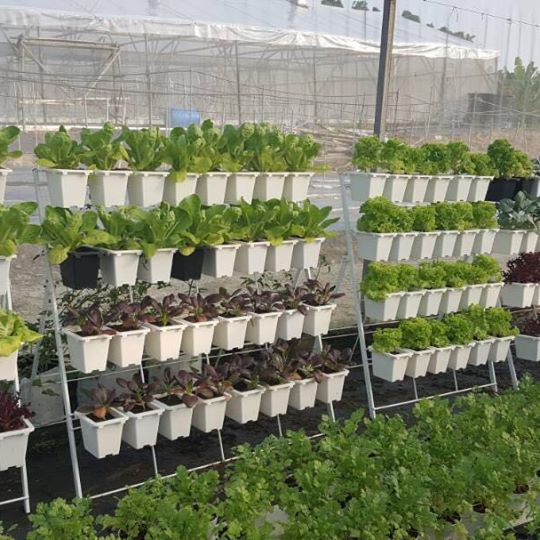
Container Garden
This works well if you have limited space, high rise residence, don’t have a plot of land to grow fresh vegetables or just experimenting. Many vegetables can be adapted to growing in a pot, you are only limited by the size of the containers. Here are the list of suggested containers for you to choose:
Alternatively, you can also be creative and make your own using recycle materials. Whichever types of containers you choose, please ensure that there is sufficient drainage to prevent damaging the roots.
Elevated Planters

This is elevated containers which is perfect for wheelchair gardeners or older individuals who have difficulty bending down. It has bottoms that are usually are slatted, with semi-permeable cloth barrier for drainage and prevent the soil from falling out at the same time. As the soil level is raised it prevents weeds from your garden soil, soil compaction and soil erosion whilst providing good drainage and reducing pests like slugs.
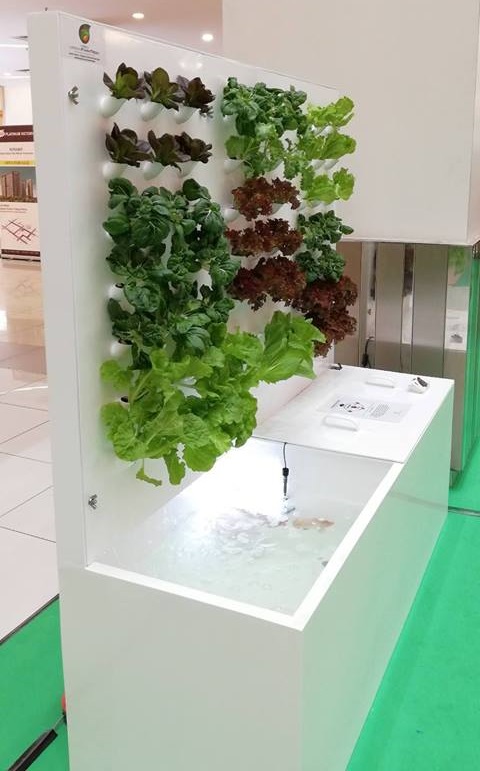
Vertical Garden
This maximizes the use of space and is very suitable for urban gardening. Examples include planting in hanging containers, in the ground growing up a trellis or wall, hanging wall garden bags or vertical containers. As it is elevated, it is very accessible. When done correctly, it can be aesthetically beautiful.
Hydroponics
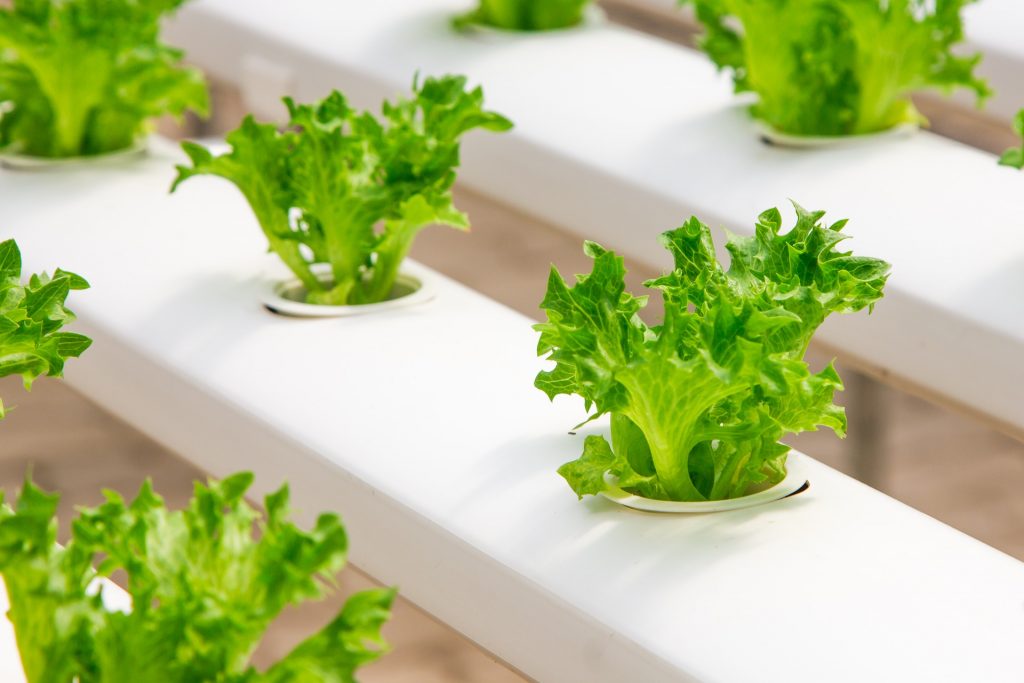
Instead of growing vegetables traditionally in soil, it is grown in a system with mixture of water and nutrients. Investment level for this method varies from a simple basin to a fully functional pumping system.
Aquaponics
This is the combination of hydroponics and aquaculture. It is a symbiosis system where generally the plants naturally filters the water for the fish whilst the fish waste is absorbed by the plants as nutrients
Step 2: Plan your Garden
Plan the area well to avoid overcrowding. Consider proper spacing and companion planting.
Proper Spacing
If you want to have a variety of vegetables in your garden, it is important to note some plants require more space than another. Proper spacing between rows promote healthy root growth, sufficient sunlight and air circulation. The garden look tidier and more beautiful, with an abundance of healthy growth too.
Please refer below on spacing requirements of some vegetables.
Companion Planting
Some vegetables when plant together results in better quality and growth. Here is an example guideline of companion planting vegetables for mutual benefits.
Getting Started with Your Garden
Select one of the steps below:
FAQ: How to separate and transplant seedlings that are grown too closely together?
Step 1: Prepare the Soil
The key foundation to your garden is having a properly conditioned soil. Good soil is ‘alive’ as it is rich in microorganisms, helpful bacteria, worms and so forth, which appreciate being fed with organic matter on a regular basis. By adding and spreading enough compost on top of the soil regularly is a way of feeding the soil which will yield strong, productive plants and increase harvest.
To make your own compost, follow these few simple steps. If you do not want to wait for 2 months, you can easily purchase the ready made compost here.
Step 2: Seeds
Planting from seeds is an inexpensive way of growing many vegetables, herbs and flowers. Some plants you can save the seeds easily and some is easier bought. If you choose to save your seeds here are some advise:
-
if a vegetable have obvious seeds like chili, choose a healthy good-sized, fully riped fruit
-
do not save seeds from F1 Hybrid plants
When it comes to seeds, there are many choices to choose from. You can find a good variety of ready-in-stock options here.
Step 3: Germinating Seeds and Transplanting Seedlings
There are many methods of seeds germination available. Choose the method that is most suitable for you.
Peat Pot
Peat pot is a high-quality compressed substrate that will expand into planting medium when added with water. The consistent moist condition is perfect for those thirsty seeds during the germination process. It is easy to use and most recommended for beginners. You can either purchase the pallet by itself or get the germination kit available here.
Method:
- Place the peat pot in a transparent container
- Add water onto the peat pot making sure to soak each individual pellets
thoroughly - Wait for the peat pots to fully expand and drain off the excess water
- Plant 2 seeds in the centre hole of each peat pot
- Cover the transparent container with its lid
- Place the container on sunny window sill
- Open and close the lid on a daily basis to prevent mould. Spray some water if necessary to maintain moisture level
- Once the seeds have germinated, move the set outdoors in a shaded area and leave the lid open
- Keep a small amount water in the bottom of the tray to keep the pot moist but not soaked
- Grow the seedlings until it is about 8 cm (3 in) tall or ready to be transplanted
- Layer the garden bed with the prepared soil
- Use the back of hoop rake to make the bed smooth and level. Remove any pebbles, sticks or debris
- With the trowel handle create a hole about 1.5 times the size of the expanded peat pot on where you wish to transplant. Ensure sufficient spacing
- Remove the seedlings from container by pushing up from below making sure the roots is not disturbed
- Gently place the seedling and root ball into the hole
- Fill any gap with soil
- Gently water the seedlings
Paper Towel
A very simple soil-less method. Materials required is paper towel and transparent container.
Method:
- Wet a square of paper towel and squeeze off excess water
- Place the moist paper towel into the transparent container
- Add seeds on top of the paper towel, making sure there is a gap between seeds
- Cover the transparent container with its lid
- Place the container on sunny window sill
- Open and close the lid on a daily basis to prevent mould. Spray some water if necessary to maintain moisture level
- Gently remove the seedlings individually and transplant to the garden bed (filled with quality soil) when the weather conditions in your area are safe for the young plant before they become embedded into the paper towel
Direct sowing
This is the regular method and is preferred for some crops that resent having their roots disturbed as there is no transplanting involved. Most importantly you need to ensure Step 1 (Prepare the Soil) is done properly.
Method:
- Layer the garden bed with the prepared soil
- Use the back of hoop rake to make the bed smooth and level. Remove any pebbles, sticks or debris
- Water the soil
- Add seeds on the soil with sufficient spacing
- Cover with a light layer of soil
- Gently pat down the soil so the seeds don’t move around
- Water again gently and evenly
- Remove the weaker plants (if necessary)
- Allow the seedlings to grow into mature plants
Container
This is similar to direct sowing except it is using a container. It is easy to move around to protect the seeds and seedlings from extreme weather like heavy rain. Any container that is at least 2-3″ deep with drainage holes can be used. Here is examples of containers:
- Germination tray
- Seeds tray
- Poly bag
- Grow bag
- Pot
- Paper cup
- Egg carton
Method:
- Fill the container with soil leaving about 1 cm (1/2 in) from the rim
- Water the soil
- Add seeds on the soil with sufficient spacing
- Cover with a light layer of soil
- Gently pat down the soil so the seeds don’t move around and water again
- Place it on sunny window sill
- Grow the seedlings until it is about 8 cm (3 in) tall or ready to be transplanted
- Layer the garden bed with the prepared soil
- Use the back of hoop rake to make the bed smooth and level. Remove any pebbles, sticks or debris
- With the trowel handle create a hole about 1.5 times the size of the seedling root balls on where you wish to transplant. Ensure sufficient spacing
- Remove the seedlings from container by pushing up from below making sure the roots is not disturbed
- Gently place the seedling and root ball into the hole
- Fill any gap with soil
- Gently water the seedlings
FAQ: How to separate and transplant seedlings that are grown too closely together?
Many times we have a lot of gardeners asking us on how to separate seedlings that are grown too close to each other. It is actually much easier than it seems. So, we have put this video guide together specially for you. Hopefully this will help:
Maintaining Your Garden
These are the basic work required to maintain your garden:
Watering
It is important to keep your plants well-watered for good harvest especially during flowering and fruit setting. Ideally by installing an irrigation system it will help ensures your planting medium is kept moist at all time. Otherwise the common hosepipes or watering can will do the job. The best time to water is early in the morning and late in the afternoon. Water through the soil with care to ensure absorption by the roots and prevent the soil from spreading out.
Feeding
Crops takes a lot of nutrients from the soil, by feeding regularly will help achieve a successful harvest. There 3 major nutrients in fertilisers are:
- Nitrogen (N): for leaf growth
- Phosphorus (P): for healthy roots
- Potassium (K): for flowering and fruiting
For vegetables, it is preferred to use organic fertilizer like hydrolyzed fish fertilizer, fortified pelletised bio-organic fertiliser or heat treated chicken manure to increase organic matter in the soil. Non organic fertilizer can be applied too but in a very small amount as the nutrient content is high and can be too much for the seedlings. Imagine feeding your infant with an adult vitamin C, it can be overwhelming. After fertilization it is important to water your plants as per instructions.
The amount of fertilizer require is dependent on:
Soil type and quality
If you have invested in using good quality soil that is rich in microorganisms, organic matter, nutrients and moisture, you only need add more compost or a small amount of fertilizer to supplement the growth.
Type of vegetables being grown
Root vegetables like carrot requires more fertilizers in comparison to the leafy greens.
Tending Your Garden
It is crucial to keep on top of crops development. Some plants can be harvested within 1-2 months and some will take longer to fully develop. Continued care and maintenance on top of watering and feeding includes:
- Remove weeds
- Regularly tie-in for climber plants (e.g. cucumber, bitter gourd, four-angled beans etc)
- Add soil on frequent basis to developing tuber plants to prevent light exposure
- Provide structure support
- Regular harvest to encourage growth (e.g. basil, butterfly pea flower, chilli etc)
- Remove yellowing foliage
- Check plants for pests and diseases
Pests, Diseases and Weeds
A quick guide on pest, diseases and weeds:
-
Common garden pests
-
Dealing with pests naturally
-
Common garden diseases
-
Dealing with diseases naturally
-
Prevention of pest and diseases naturally
-
Dealing with weeds naturally
Common Garden Pests
(Chart source from: http://www.garden365.com/container-gardening/organic-garden-pest-control/)
Dealing with Pests Naturally
Methods to consider:
- Having a population of beneficial insects and creatures for biological control
- Installing barriers like nets and row covers
- Handpicking problem areas
- Companion planting
- Horticultural oils like Neem Oil Spray
Common Garden Diseases
(Chart source from: http://blog.greatgardensupply.com/help-moldy-plants-summer-garden-diseases/#.W_V3npMzZmA)
Dealing with Diseases Naturally
Methods to consider:
- Keeping gardening tools sterilised
- Enough watering
- Good ventilation
Prevention of Pest and Diseases
By keeping a healthy balance in the garden, it is possible to avoid many unwanted pests and diseases even without chemical pesticides. These are the few basic things to keep your garden strong:
- Provide sufficient light
- Nourished with nutrients
- Enough watering
- Good ventilation
- Well maintained with good hygiene
Dealing with Weeds Naturally
Methods to consider:
- Pull the weeds and its roots by hand
- Use natural products like Weed Killer
*Avoid pouring toxic chemicals into the soil as it will be absorbed by the vegetable.
Harvesting Your Vegetables
Harvesting the fruits of your labor is exciting! It is our reward after tending the garden everyday. Now, these are 2 main factors to good harvest:
-
Timing – not too soon or too late
-
Right way to harvest – without damaging the plant and enabling longer storage
Below is a simple rule of thumb with the common vegetables categories for your reference but at the end of the day you will need to make the call.
-
Alliums
-
Cruciferous vegetables
-
Fruiting vegetables
-
Gourds
-
Herbs
-
Leafy vegetables
-
Pod vegetables
-
Root vegetables
-
Sweet corn
-
Vine vegetables
Timing
Onion, garlic, scallion, shallot, leek, and chives is under this category. For most of these crops, the right time to harvest is when either:
- the bottom two or three leaves have turned yellow
- the tops fall over
- the plant wilts
- or the plant dies back
Right Way to Harvest
For garlic, loose the soil with a garden fork and pull the whole bulbs out of the soil. Spread your harvest on a mesh (for good ventilation) and cure in full sun or light shed avoiding rain. Do not remove the tops until it is ready for storage. It is ready when the skins are dry and necks are tight – usually around 2 weeks.
Cruciferous Vegetables
Timing
Broccoli and cauliflower for example should only be harvested when the head is fully formed.
Right Way to Harvest
Using a sharp knife cut the head free of the stalk, small heads will soon form as side shoots for several more weeks.
Fruiting Vegetables
Timing
Fruiting vegetables are ready for harvest once they have reached their mature size. The earlier you harvest, the fruit is more tender and it will encourage the plant to produce more fruits.
For example:
- Brinjal: 55 to 70 days.
- Eggplant: 80 to 120 days.
- Red chili and chili padi: 60 to 100 days after setting out when they are full sized.
- Tomato: The fruits can be harvested 3 months after planting.
Right Way to Harvest
Cut the fruits from the plants with secateurs (shears) leaving some stem attached.
For example:
- Tomato: Twist the fruits from the stem cut off the fruit with a sharp knife.
Gourds
Timing
The best time to harvest when it turns pale.
For example:
- Bitter gourd: 50 – 70 days
Right Way to Harvest
Cut the fruits from the plants with secateurs (shears) leaving some stem attached.
Herbs
Timing
Most herbs can easily be harvested anytime whenever their leaves are of edible size. For fennel, it is ready when the bulb is firm to the touch and roughly 10cm (4 inch) wide.
For example:
- Coriander: The seed heads will emit a pleasant spicy odor when they are ready for harvesting.
Right Way to Harvest
Harvest individual leaves or pull up whole plant. Depending on your usage, you can cut entire stem/sprig. For parsley the plant to re-grow new leaves when cut at the soil line leaving the cut stalk in the ground.[/vc_column_text][vc_column_text]
Leafy Vegetables
Timing
Leafy vegetables are fast growing. It is ready as soon as the leaves reaches edible size.
For example:
- Amaranth perfect red and water convolvulus: 30 days
- Chinese cabbage ong king and Chinese kale: 30 – 45 days
- Lettuce: Can be ready in as little as three weeks.
- Nai you pak choy and aromatic celtuce: 45 – 50 days.
Right Way to Harvest
To harvest, pull up whole plant or using a sharp knife/secateurs cut at the soil line leaving the cut stalk in the ground to allow the plant to re-grow new leaves. For some, it is possible to harvest individual leaves.
For example
Pod Vegetables
Timing
By harvesting pod and beans vegetables regularly before the seed successfully reach big, tough and inedible size will increase the plant’s harvest volume. Plus if beans stay on the plant for too long it become less tender and tasty.
For example:
- French beans: Beans are at their tastiest when pods are full sized and firm and freshly picked
- Long beans: About 2 weeks after flowering.
Right Way to Harvest
Pick the plant frequently.[/vc_column_text][vc_column_text]
Root Vegetables
Timing
Crops like potatoes and peanuts etc are considered ready for harvest when the plants wilts or dies back.
For example:
- Chinese radish: 20 to 30 days
Right Way to Harvest
Pull or dig the roots. To remove the tops but maintaining moisture at the same time, grasp the root in one hand and the greens in the other and twist off the tops. But for carrots, leave about 2.5 cm (1 inch) of tops from the root.[/vc_column_text][vc_column_text]
Sweet Corn
Timing
The best time to harvest is early morning before the warm sun. Examine the silk at the top of the corn ear. It is time to harvest when there is a small amount of pliant, greenish silk near the top of the husk with dry, brownish silk at the ends.
Right Way to Harvest
Hold the stalk in your non-dominant hand to steady it and twist each corn ear off of its stalk with your dominant hand. Do not remove the husk until it is ready for cooking.
Vine Vegetables
Timing
Vegetables that grows on vine like tomatoes or melon is considered ripe when the stem holding it begins to change – turning yellowish and loosening its grip on the fruit. Ripe fruits will slip loose easily. Whereas Japanese cucumbers are ready when it is still dark green all over.
For example:
- Cucumber: 55 to 65 days.
- Japanese cucumber: 40 to 80 days
Right Way to Harvest
Cut the fruits from the plants with secateurs (shears) leaving some stem attached.
For example:
- Cucumber: Fruit should be picked when young to avoid bitterness. Pick the fruits regularly to ensure a continuous crop and water plentifully and often.
Post-Harvest Care
Keeping and Storing the Harvest
Vegetables are still alive after being harvested and continue living hence it is important to use the right tool for longer storage. If stored correctly, you will be able to enjoy its freshness for many days.
Cleanup
Every plant have its lifespan so when it gets old, it’s time to clear up the soil make sure there is no roots left especially sick plants. Rake up the soil for aeration and help prevent weeds from gaining a foothold. Condition the soil and let it rest for about 2 weeks before growing anything again.
Recycle and Reuse Garden Wastes
If you have garden wastes like dried leaves, vegetable cuttings and/or unused harvest, turn it into compost. Be selective on what you add into your compost pile. Avoid sickly plants that were attacked by diseases or/and pests.
Preparing the Garden for Next Batch
Add planting medium to the grow bed if the soil level has dropped.